
Battle of the Imjin River (1951): why the Glosters could not get off Gloster Hill
· 1951-04-22 – 1951-04-25
This analysis is for education and research. Content on ongoing wars may change as new information emerges. We label claims separately from confirmed facts.
How the decision points in this analysis are adjudicated → · Glossary
Overview (BLUF)
The Battle of the Imjin River, known in Korea as the Battle of Solma-ri (Seolma-ri), was a defensive battle fought from the night of 22 April to the afternoon of 25 April 1951 around Jeokseong-myeon in what is now Paju, Gyeonggi Province. The Gloster battalion of the British 29th Brigade faced the Chinese 63rd Army (sources 1, 10). It is not to be confused with the 1592 battle on the Imjin during the Japanese invasions of Korea. On the morning of the 25th the battalion left Hill 235 and tried to break out of the encirclement. Forty men, 4 officers and 36 other ranks, reached the lines of the ROK 1st Division (source 1 pp. 427–428, source 2). The US Army official history records 21 officers and 509 other ranks of the battalion as taken prisoner (source 1 p. 428).
As of 10 November 2026 we reach three judgements.
- The battalion's fate turned on the gaps on either flank. From the start about 1.5 km separated it from the ROK 12th Regiment to the west, and about 3 km from the 1st Battalion, Royal Northumberland Fusiliers (RNF), to the east. On the 24th the eastern gap widened to about 6.4 km (four miles), and the western gap reached about 6.4 km too as the ROK 12th Regiment was pushed back about 4.8 km (the western figure is our own sum; source 1 pp. 385, 412, 416).
- The main reason the battalion was not pulled out on the 24th was likely that its true condition never properly reached division and above. The explanation that it was deliberately left behind to cover the corps withdrawal is very unlikely. Our confidence is moderate: most of the evidence comes from a single volume of the US official history, and we have not seen the British war diary.
- The only rescue effort on the 25th that brought anyone out came from the ROK 1st Division. Light-tank platoons of the US 65th Infantry went up 5Y twice that day without reaching the battalion. The 2nd Battalion of the ROK 12th Regiment and tanks of the US 73rd Heavy Tank Battalion pushed up the Nullori valley, and the 40 survivors came out behind them (source 1 pp. 421–427).
Background: what were the Chinese after?
The US Army official history gives Seoul as the immediate objective of the Chinese spring offensive that opened on 22 April 1951 (source 1 p. 379). In the west, the 19th Army Group planned to cross the Imjin on a front of about 19 km (twelve miles) centred on the Korangp'o-ri bend and drive south-east between Routes 1 and 33. The 64th Army was to take on the ROK 1st Division and the 63rd Army the British 29th Brigade. The same book says Peng Dehuai "reportedly" promised Mao Zedong the capture of Seoul as a May Day gift. That is an American reconstruction, not confirmed in Chinese primary sources.
Chinese accounts put the weight elsewhere. An article republished by China Military Online (中国军网) on 31 August 2021 gives the 63rd Army's aim as encircling and annihilating the British 29th Brigade, and names Kamak-san, 675 m high, as the key to the battle (source 6). Whoever held Kamak-san could cut the 29th Brigade off from the US 3rd Division and close the British line of retreat at Solma-ri. Where the US official history looks to the western gap on the ROK 1st Division side, the Chinese side was aiming at Kamak-san in the east. Put the two accounts together and the 29th Brigade was only weakly tied to its neighbours on both sides (our interpretation).
The 29th Brigade held the western half of the US 3rd Infantry Division's front. The division commander saw the bend where the Imjin turns at a right angle as the weakest point: a breakthrough there would cut Route 33 and endanger the 65th Infantry to the north (source 1 p. 386). On the morning of the 23rd the Eighth Army commander, Van Fleet, ordered I and IX Corps back to Line Kansas. The division swung south like a gate hinged on the Gloster position at its western end (source 1 pp. 389, 397). In the same offensive, further east at Kapyong, the 27th Commonwealth Brigade fought its own isolated defence (our analysis of Kapyong).
Terrain and weather: where are Hill 235 and Castle Hill today?
Hill 235, known as Gloster Hill, is a peak about 0.4 km south-west of today's memorial park to the British at Solma-ri (Jeokseong-myeon, Paju). Hill 148, which A Company lost on the first night, is Jungseongsan, the hill topped by the historic Chiljungseong fortress (source 1 p. 388, sources 10, 12, 15; distance our own calculation). The two peaks are 2.36 km apart in a straight line.
Matching the hill numbers in the official history against OpenStreetMap (OSM) names and SRTM elevation gives the table below (source 1 pp. 385–388, sources 8, 12, 15, 16). Coordinates and distances are our own readings and calculations. SRTM reads peaks 4–12 m low, so names follow the hill numbers in the sources.
| Name in the sources | Present name and location | Height in sources / SRTM reading | Certainty |
|---|---|---|---|
| Hill 235 (Gloster Hill) | Peak south-west of the memorial park | 235 m / 231 m | High |
| Hill 148 (Castle Hill) | Jungseongsan (Chiljungseong) | 148 m / 142 m | High |
| Hill 314 (C Company) | Peak east of Gamaksan-ro, 1.84 km east of Hill 235 | 314 m / 314 m | High |
| Hill 675 | Kamak-san (Gamaksan) | 675 m / 663 m | High |
| Hill 194 (Belgian battalion) | Geumgulsan, inside the bend at the Imjin–Hantan confluence | 194 m / 185 m | High |
| Hill 182 (D Company) | Peak east of Gamaksan-ro | 182 m / 178 m | Probable |
| Hill 144 (B Company) | Two candidate peaks | 144 m / 137 m, 124 m | Uncertain |
| Gloster Crossing | Ford about 2.2 km north-north-east of Chiljungseong | Water level about 9 m | Probable |
| Choksong, Solma-ri | Gueup-ri area (Jeokseong), Seolma-ri | – | High |
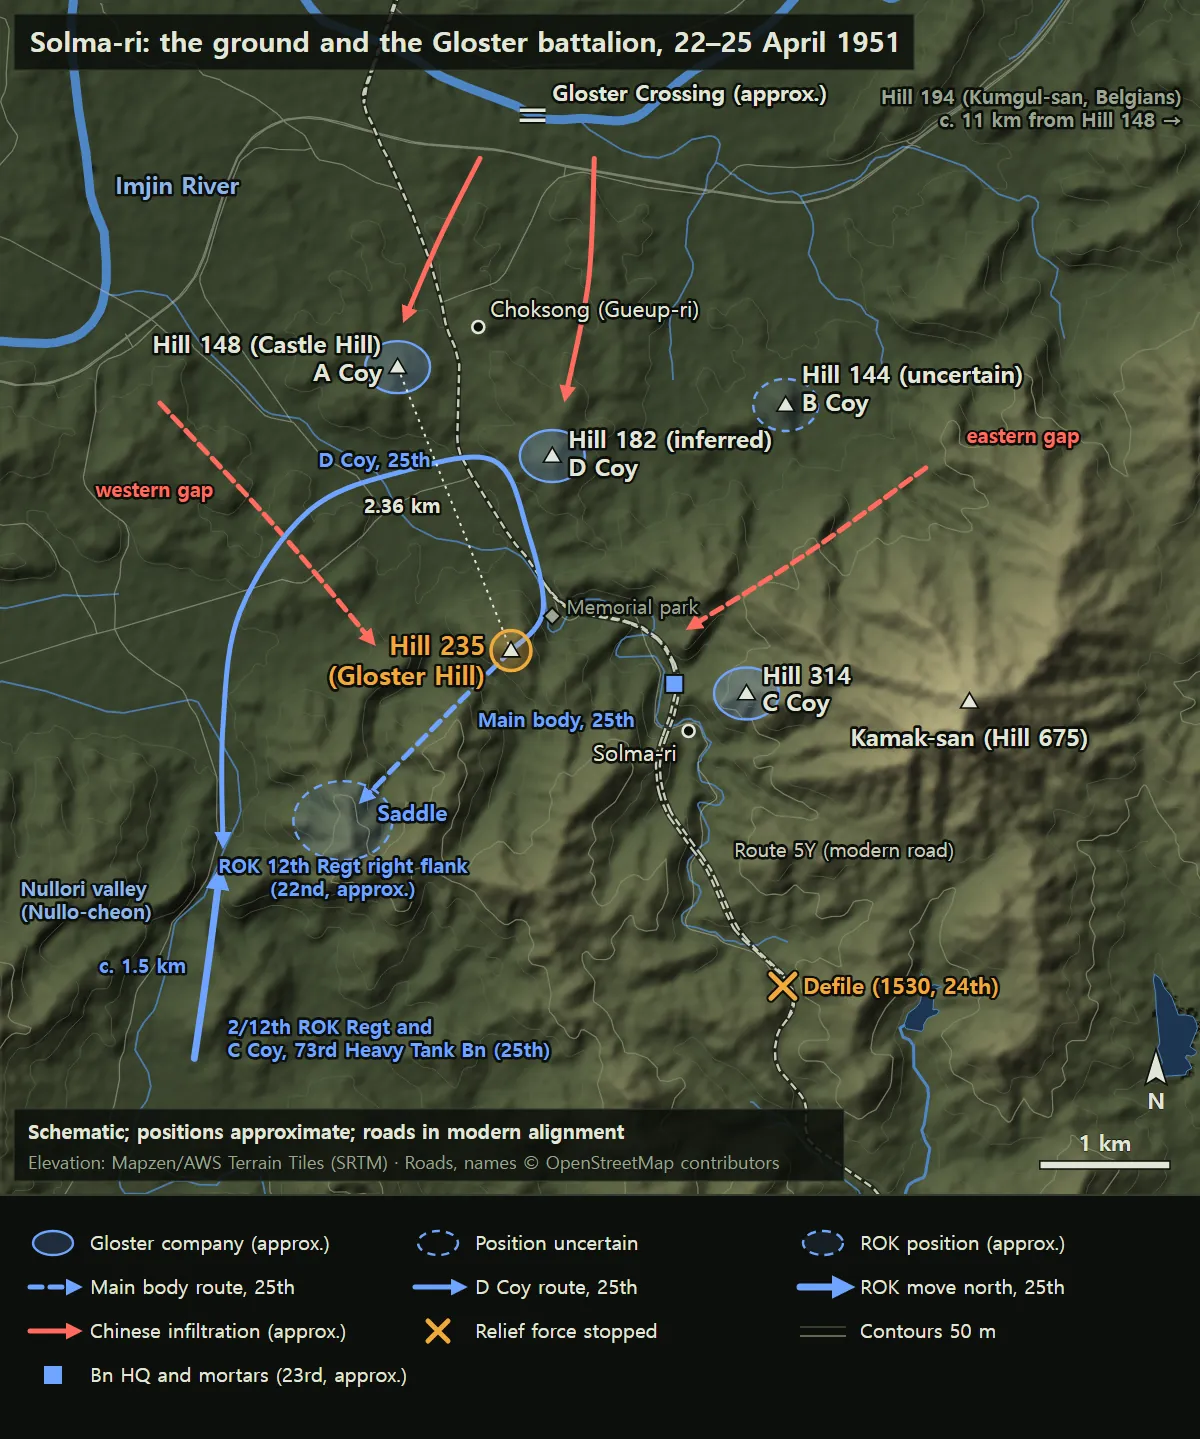
The battalion's positions lay about 2.5 km south of the Imjin, with the companies spread out along the ends of long ridges reaching towards the river (source 1 p. 388). By our calculation Hill 148 is 2.2 km from the river, which agrees with the official history. Route 5Y ran north–south through the middle of the battalion. We take today's provincial road 371 (Gamaksan-ro) to run up the same valley, because the side of the road on which each of the four hills lies matches the official history in every case. There is no documentary evidence, however, that the old road followed the same line.
In military terms the ground breaks down as follows.
- Observation: Kamak-san (Hill 675) is the highest peak in the whole brigade area (source 1 p. 388). Its summit is 3.54 km east of Hill 235 (our own calculation), and whoever held it overlooked both the 5Y valley and Route 11.
- Key terrain: Hill 235 is a long, narrow ridge. Except to the north-west and south-east its slopes are very steep, which left only two directions from which a large force could climb it (source 1 pp. 415–416). That favoured the defence, but once those two directions were blocked the ways out were just as few.
- Obstacles: the southern stretch of 5Y ran through defiles that were narrow and steep-sided. The Centurion tank, nearly 12 ft (about 3.6 m) wide, could not get through, and the tank crews knew this from earlier reconnaissance (source 1 pp. 412, 414). The Encyclopedia of Korean Culture also records that the relief force's tanks could not pass the narrow road at the Sagimak pass (source 7).
- Avenues of approach: towards the ROK 1st Division in the west there was a valley track over a saddle about 1.5 km south-west of Hill 235, and the Nullori valley beyond it (source 1 pp. 425–427, source 18).
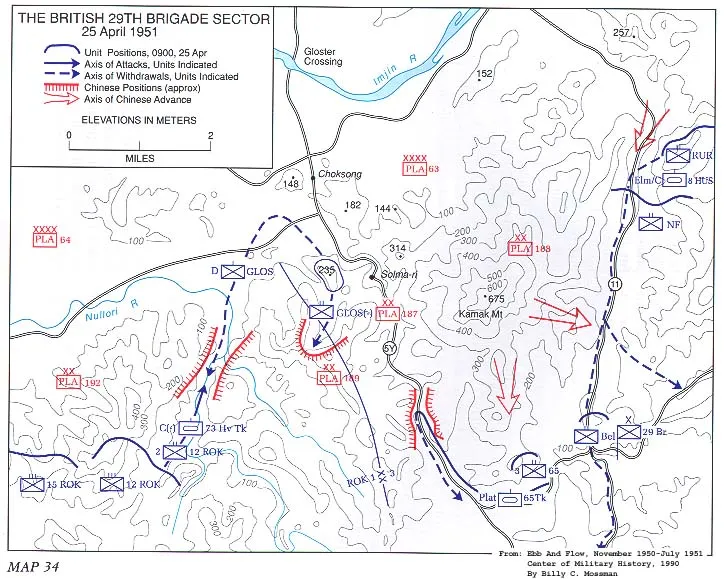
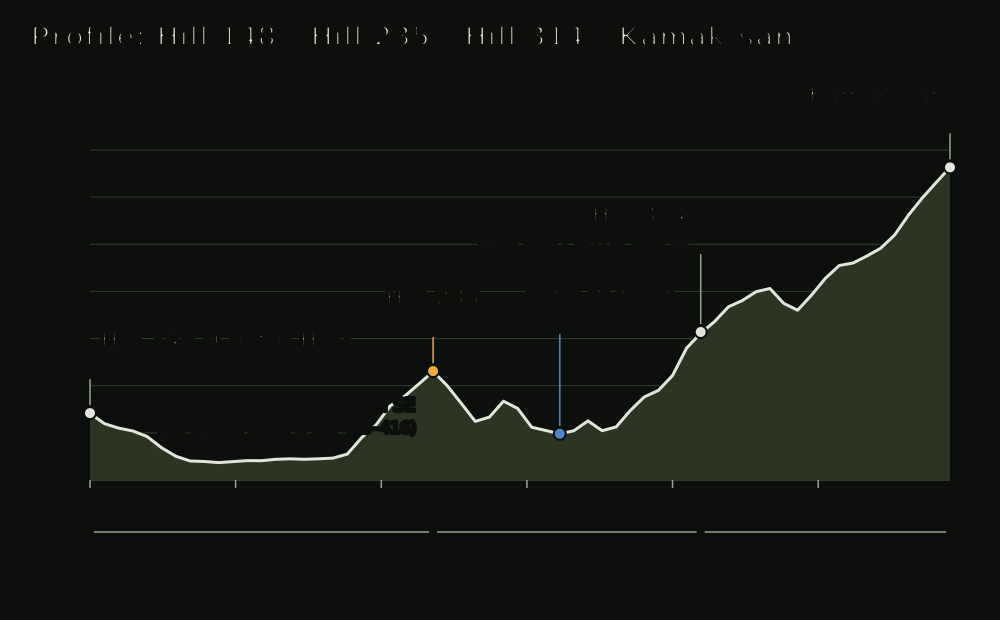
We found no daily weather record. The official history says there was a full moon on the night of 22/23 April, so the ambush party could see the far bank clearly (source 1 p. 388). The Chinese article says the British, as usual, expected an attack on a moonlit night, and gives the Imjin as about 100 m wide and about 1 m deep (source 6, Chinese account). Early on the 24th Mustang fighters struck the Kamak-san area with napalm, and on the morning of the 25th a flight of F-80s broke up an attack forming on the north-west slope of Hill 235 (source 1 pp. 413, 417). On those two mornings at least, the weather allowed air operations (inference).
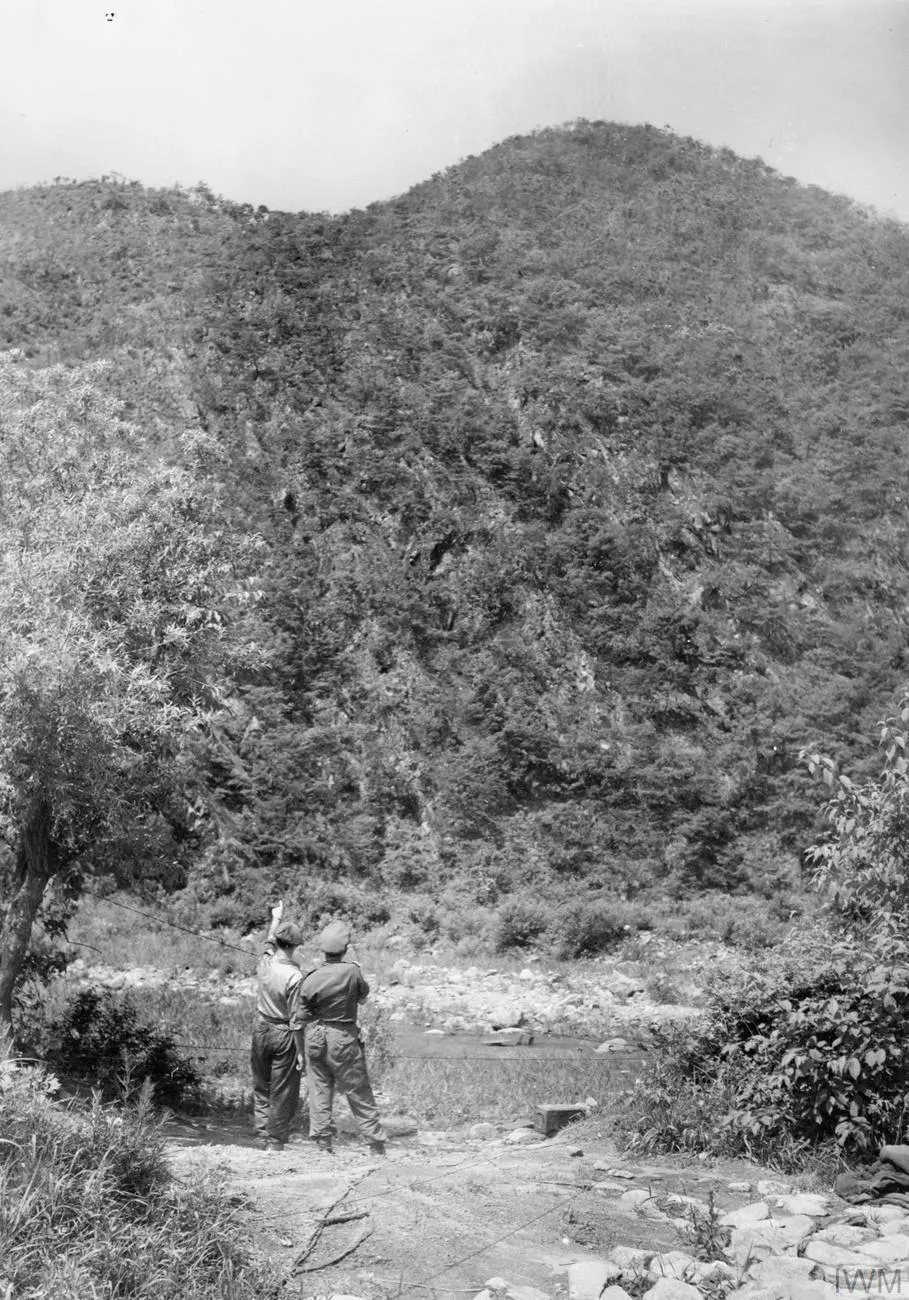
Today Solma-ri is a place of remembrance. The archive of the National Museum of Korean Contemporary History places the battlefield at Maji-ri, Jeokseong-myeon, Paju, and says the memorial was raised on Hill 235 (source 10). According to Paju City's exchange log, Paju and Gloucester signed a sister-city memorandum of understanding on 22 April 2014, and the memorial park was unveiled the next day. The formal sister-city agreement followed in November 2024, when a Paju delegation visited Gloucester. A 75th anniversary ceremony was held on 23 April 2026 (source 11). In November 2024 the UK Ministry of Defence announced that it had identified two men of the Gloster battalion buried as unknown soldiers at the United Nations Memorial Cemetery in Busan, and that their graves had been rededicated: Major Patrick Angier, who commanded A Company on Hill 148 when the battle began, and Sergeant Donald Northey, who died during the move to Hill 235 (source 20).
Forces and dispositions: who was where
On 22 April 1951 the Gloster battalion went into battle with 28 officers and 671 other ranks. In support were 70 Battery, Royal Artillery (6 officers, 22 other ranks) and C Troop, 170 Mortar Battery (1 officer, 45 other ranks) (source 1 p. 428).
- Gloster battalion (CO Lieutenant-Colonel Carne): A Company was on Hill 148 west of 5Y, with D and B Companies on Hills 182 and 144 to the east. C Company gave depth on Hill 314 below Kamak-san, about 1.5 km behind D Company. Battalion headquarters and the mortars were behind C Company in the valley just above Solma-ri, and the battalion's pioneer platoon held Hill 235 (source 1 p. 388).
- The rest of the 29th Brigade: the RNF held the centre of the brigade, and the Belgian battalion was on Hill 194 (Geumgulsan) north of the Imjin. The brigade reserve, the 1st Battalion, Royal Ulster Rifles (RUR) and C Squadron, 8th King's Royal Irish Hussars (Centurion tanks), was about halfway along Route 11, the brigade supply road (source 1 pp. 385–386, source 8). The British 45th Field Regiment provided fire support (source 1 p. 426).
- Neighbours: the right flank of the ROK 1st Division's 12th Regiment lay about 1.5 km south-west of the Glosters (source 1 p. 385). The US 3rd Division's reserves were concentrated to the east, above the Hantan, and the 15th Infantry was corps reserve (source 1 p. 386).
- Chinese forces: Chinese accounts say the 63rd Army put its 187th and 188th Divisions in the first echelon (source 6). In the official history the 187th Division struck the Gloster front first and the 188th Division widened the attack towards the RNF and the Belgians, while a force believed to be the 189th Division came through the gap between the Glosters and the ROK 12th Regiment on the night of 23/24 April (source 1 pp. 387, 397, 412, 416). To the west, the 64th Army's 192nd and 190th Divisions pushed the ROK 1st Division back (source 1 p. 416). Neither side's records give a reliable figure for the Chinese strength committed to this battle.
Course of the battle: from the night of 22 April to the afternoon of the 25th
The Gloster battalion's battle lasted about 64 hours, from the first crossing at about 2200 on 22 April 1951 to about 1400 on the 25th, when the last survivors reached ROK lines (source 1 pp. 388, 427). It falls into four phases.
- The crossing and the loss of the castle (2200 on the 22nd to the morning of the 23rd): at dusk on the 22nd the CO placed an ambush party of 16 men from C Company in derelict houses in front of Gloster Crossing. From about 2200 they turned back four crossing attempts and then withdrew. A battalion of the Chinese 559th Regiment then crossed at the ford and at an underwater bridge about 2.5 km to the west (source 1 p. 388). A Company, down to 58 effective men, lost its platoon position in the castle on top of Hill 148 before dawn, and Lieutenant Curtis fell leading a counter-attack (source 1 p. 388, source 5). At daybreak the CO pulled the forward companies back towards Solma-ri: A Company to Hill 235, D Company to the flat-topped hill east of it (source 1 p. 389).
- Encirclement (daytime on the 23rd to the morning of the 24th): at 0830 on the 23rd air observers reported Chinese troops moving into the gap of about 3 km between the Glosters and the RNF (source 1 p. 387). When the battalion's supply point on Route 5Y was attacked in the afternoon, it became clear that the battalion was surrounded (source 1 p. 397). After C Company lost the top of its hill that night, battalion headquarters and C Company moved to Hill 235 west of 5Y. B Company was left where it was until morning. It tried to break through at first light, but only 20 men reached the main body (source 1 pp. 411–412).
- The failed relief (0730 to 2100 on the 24th): three rifle companies of the Philippine 10th Battalion Combat Team (BCT), with four light tanks and six Centurions, set off up 5Y at 0730. At about 1530, as the tanks began climbing into the pass, the brigade commander ordered the whole force on to the Glosters. Almost at once the leading light tank lost a track to a mine or a mortar round in a defile. With the road blocked, the tank commander obtained brigade's permission to withdraw, and the relief force was back at its start point by about 1900. The official history does not say clearly who at brigade allowed the Filipino battalion to withdraw as well, and the corps commander, Milburn, singled out the confusion of instructions in his report afterwards (source 1 pp. 412–415, 428). After dark the battalion moved onto the ridge of Hill 235 and was in position by 2100, with about 350 men fit to fight (source 1 pp. 415–416).
- The last night and the break-out (night of the 24th to 1400 on the 25th): through the night the Chinese came up the north-west and south-east slopes. The crest was lost at first light and retaken by a small counter-attack, and a flight of F-80s broke up the next attack as it formed (source 1 p. 417). At 0500 on the 25th the corps commander, Milburn, ordered a withdrawal to Line Delta, but told the ROK 1st Division and the US 3rd Division not to pull back until the Glosters had been extricated (source 1 pp. 418–419). On receiving the order, the division commander cancelled the 65th Infantry's relief attack set for 0630 and handed the rescue to the brigade commander and the commander of the 65th Infantry (source 1 pp. 421–422). At about 0900 the brigade commander ordered the battalion to fight its own way out, and the CO gave the order to withdraw at about 0930 (source 1 pp. 424–425). The main body, heading down a valley to the south-west, was caught at a saddle by machine-gun fire from all sides and laid down its arms. Of the D Company group that went round to the north, 40 men reached ROK lines at about 1400 (source 1 pp. 427–428). A light-tank platoon of the 65th Infantry went up 5Y after 0900, got into a firefight well short of Hill 235 and was back between noon and 1300. A second platoon set out at about 1400 and halted when the British tank commander convinced it that light tanks could not reach the hill (source 1 pp. 422–424). Late that afternoon the brigade main body withdrew to Line Delta without the Gloster battalion (source 1 pp. 424–425).
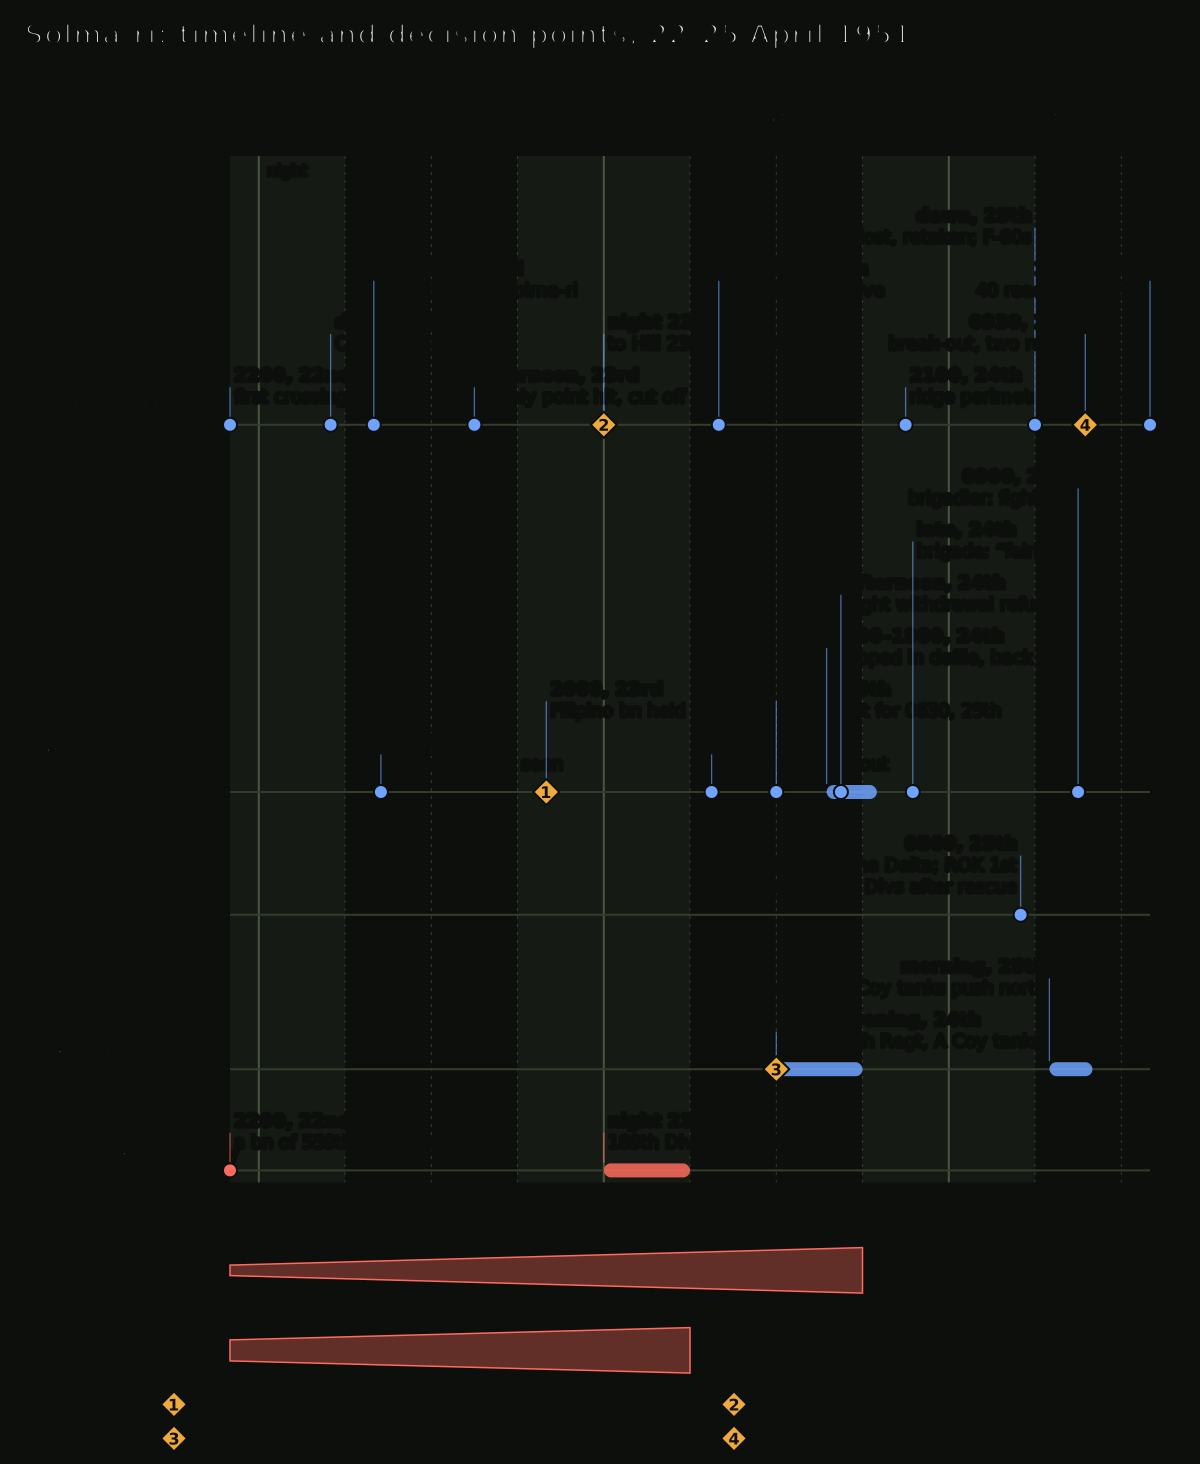
Decision points: four forks in the road
The battle turned on four decisions taken between the evening of 23 April 1951 and the morning of the 25th by the Gloster CO, the brigade commander and the commander of the ROK 1st Division. The exchanges between division and brigade during the day on the 24th are examined separately in the next section.
Decision 1: where to use the newly arrived Filipino battalion (29th Brigade commander, 2000 on the 23rd)
- Situation: at about 1400 on the 23rd the division commander ordered the Philippine 10th BCT to join the 29th Brigade and close the gap between the RNF and the Glosters. The battalion reached brigade headquarters at about 2000 (source 1 pp. 393–396). Chinese troops had been coming through that gap since the morning.
- Options: (a) commit it to the gap at once, in the dark; (b) hold it overnight and commit it at first light; (c) send it up 5Y to link up with the Gloster battalion.
- Decision and result: the brigade commander chose (b), judging it too late in the day (source 1 pp. 395–396). That night C and B Companies were driven back, and the next morning the Filipinos were used not for the gap but for the relief up 5Y. The relief came to depend on a single defile.
- What could have been done differently: moving into a gap at night on unfamiliar ground was dangerous. But the link eastwards to Kamak-san was already going before the decision was taken. The official history has units of the Chinese 187th and 188th Divisions moving towards Hill 675 during the day on the 23rd (source 1 p. 397), and the Chinese account claims the 561st Regiment took Kamak-san by 1300 that day (source 6, Chinese claim). Early on the 24th at least a thousand Chinese were reported on Hill 675 (source 1 p. 413). On that reading the night's wait did not cut the link; it let slip a chance to win back a gap that was already open (inference).
Decision 2: where and when to concentrate (Gloster CO, night of 23/24 April)
- Situation: on the night of 23/24 April the Chinese took the highest point of C Company's hill, which looked straight down into the valley holding battalion headquarters and the mortars (source 1 p. 411).
- Options: (a) hold where they were; (b) concentrate the whole battalion on Hill 235 at once; (c) move only headquarters and C Company, and bring in the distant B Company after first light.
- Decision and result: the CO chose (c), fearing that B Company would become scattered on a long move in the dark. The official history accepts that he had few alternatives, but judges that the decision played to some extent into Chinese hands. The Chinese did not follow C Company as it pulled back but concentrated on B Company. A good deal of ammunition and food was left behind in the hastily abandoned valley (source 1 pp. 411–412).
- What could have been done differently: the risk of a night move had to be weighed against the risk of isolation. Had the stores in the valley been moved or destroyed first, there would probably have been less need to risk sending a carrying party back to the old battalion headquarters site in the valley during the day on the 24th (source 1 p. 415).
Decision 3: closing the gap and reaching out (ROK 1st Division commander, 24–25 April)
- Situation: at about midday on the 24th the Chinese 190th Division drove a wedge more than 1.5 km deep between the ROK 11th and 12th Regiments. By evening the 192nd Division had pushed the 12th Regiment about 4.8 km (three miles) to the south-west, widening its gap with the Glosters by as much. Attacks just after midnight drove the ROK 1st Division back about another 1.6 km (source 1 pp. 416–417).
- Options: (a) hold the division front only and fall back; (b) use the reserve to clear the wedge and restore the division line; (c) do (b) and also send a force north to link up with the Gloster battalion.
- Decision and result: on the 24th the division commander counter-attacked with two battalions of his reserve, the 15th Regiment, and A Company of the 73rd Heavy Tank Battalion, and had cleared the wedge by evening (source 1 p. 416). On the 25th he went on to attempt (c), sending the 2nd Battalion, 12th Regiment and two platoons of C Company, 73rd Heavy Tank Battalion north up the Nullori valley. The force was stopped after about 1.5 km but kept fighting there until past midday. Meanwhile the D Company group came down towards its tanks (source 1 pp. 422–427). At first the tanks mistook the mud-covered soldiers for the enemy and opened fire. They stopped only after a spotter-plane pilot dropped a message, and then escorted the survivors back (source 1 p. 427).
- What could have been done differently: the CO knew neither the exact position of the 12th Regiment nor that an ROK force was coming towards him (source 1 p. 426). Had the two units been in touch, the main body might have chosen a different route (inference).
Decision 4: one order, two routes (Gloster CO and D Company commander, 0930 on 25 April)
- Situation: at about 0900 the brigade commander ordered the battalion to fight its own way out. The 45th Field Regiment had agreed to fire in support on request, but as the battalion was about to move it signalled that it was itself under fire and could not give support. That was the last message picked up on the battalion's radio (source 1 pp. 424–426).
- Options: (a) south along 5Y towards the relief force; (b) south-west down the valley and over the saddle to the right flank of the ROK 1st Division; (c) down the north-eastern slope, which the Chinese had not attacked, about 1.5 km along 5Y, then round through a side valley to the west into the southern valley.
- Decision and result: the CO chose (b), which looked the quickest (source 1 pp. 425–426). When he announced that he would stay on the hill with about 50 stretcher cases, the medical officer, the chaplain and several medical orderlies volunteered to stay with him (source 1 p. 426). His VC citation, however, says that he led a small party out and was captured within 24 hours (source 4). The D Company commander chose (c): Chinese troops had been seen in that valley over the past two days, and he judged that the companies at the rear would easily be trapped. He let his men choose between surrendering and following him, and all of them, about 100, came (source 1 p. 426). The main body was caught at the saddle; of the D Company group, 40 came back alive (source 1 pp. 427–428).
- What could have been done differently: the quickest route over the ground was also the most obvious one to the enemy. At about noon a division air observer reported "approximately 225 29th BIB soldiers", who "act as [if] they are lost. They walked to the end of the road, found a dead end-returned to their present positions and set [sic] down." The official history takes this to be the main body being caught at the saddle (source 1 p. 428).
Why was the battalion not pulled out on the 24th?
The main reason the Gloster battalion was not pulled out during the day on 24 April 1951 was likely that its true condition never properly reached division and above. The question is still argued over. In Korea, too, a professor in the Department of Military History at the Korea Military Academy named two open issues in an April 2026 column: whether calling off the relief was premature, and whether the order to hold was a sacrifice made so that the main force could withdraw (source 9).
We weighed four hypotheses about the main reason using analysis of competing hypotheses (ACH).
- H1 deliberate hold: the battalion was left in place on purpose to cover the withdrawal of the corps and the division.
- H2 misread situation: the battalion's condition was reported as better than it was as it passed from brigade to division and from division to corps.
- H3 relief plan preferred: higher command knew the facts but judged the relief attack at 0630 on the 25th a better option than a break-out.
- H4 avoiding break-out losses: the losses of breaking out of the encirclement were judged likely to exceed those of holding on.
C = consistent, I = inconsistent, N = not applicable. The ratings are our own. Most of the evidence comes from contemporary journals and 1951 interviews quoted in the US official history. The CO's warning in E5 rests on a 1954 memoir by the battalion's adjutant at the time, and E9 on British official statements.
| Evidence | Credibility | H1 | H2 | H3 | H4 |
|---|---|---|---|---|---|
| E1. On the morning of the 24th the brigade commander gave the battalion the option of getting itself out. The CO doubted it could be done and stayed, believing the whole tank and infantry relief force was coming (p. 412) | High | I | N | C | C |
| E2. The brigade's midday report on the 24th said the battalion's only urgent supply need was radio batteries. When the division commander checked the 0630 relief time for the 25th with him, the brigade commander assured him that the battalion could hold out until relieved (pp. 413–414) | High | N | C | I | N |
| E3. At an afternoon meeting Ridgway, Van Fleet and Milburn questioned waiting until morning. The division commander kept to the plan, saying the two battalions of the 65th Infantry making the attack would not finish assembling until 1730 and that he had an assurance the battalion could hold (p. 413) | High | I | C | C | I |
| E4. After the relief force turned back, the brigade commander asked to withdraw the battalion that night; the division commander refused, convinced that a night withdrawal would be costly (p. 414) | High | N | N | C | C |
| E5. Late that night brigade reported to division that the battalion was "fairly safe" (p. 415). According to the adjutant's memoir, the CO had earlier warned the brigade commander that the battalion could not hold out much longer (pp. 415–416). His VC citation, by contrast, says he repeatedly assured the brigade commander by radio that all was well (source 4) | High (brigade report), medium (warning, citation) | N | C | I | N |
| E6. Van Fleet later took the view that the position had to be held as long as possible, or the Chinese would have poured into the rear of the 3rd Division and the corps (p. 428) | Medium (after-the-fact explanation) | C | N | N | N |
| E7. The division commander said that had he known the facts on the 24th he would have taken command himself and pushed troops up 5Y. The brigade commander accepted "50%" of the responsibility for failing to make the situation clear (p. 429) | Medium (post-war statements) | I | C | I | N |
| E8. At 0500 on the 25th the corps commander ordered the ROK 1st Division and the 3rd Division not to withdraw until the Glosters had been extricated (pp. 418–419) | High | I | N | C | N |
| E9. British official accounts say that a penetration here would have jeopardised the whole line (Commons statement, May 1951), and that the CO held on knowing that abandoning the position would endanger the corps (VC citation, 1953) (sources 2, 4) | Medium (after the event, party statements) | C | N | N | N |
| Inconsistencies (I) | 4 | 0 | 3 | 1 |
Evidence that fits every hypothesis and so cannot separate them (the confusion over who authorised the relief force's withdrawal, and the delayed airdrop) is left out of the matrix. Page references without a source number are to source 1.
Reading the matrix. Only H2 has no inconsistent evidence. H1 fails in four places. Had the intention been to leave the battalion behind, the brigade commander would not have offered it the option of getting out (E1), and Ridgway, Van Fleet and Milburn would not have worried that the relief was too slow (E3). The corps commander's order that no one withdraw until the Glosters were out (E8) also runs against H1. The only support for H1 is Van Fleet's after-the-fact explanation (E6) and the British official accounts (E9). Both came after the event, and E9 explains why the CO held on rather than showing that higher command meant to leave the battalion behind. Adding them does not change the judgement on H1. H3 falls at its premise, that the division commander knew the facts (E2, E5, E7). H4 explains the refusal of a night withdrawal (E4) well. But the decision to wait until 0630 had already been taken, on the strength of the assurance that the battalion could hold, before any withdrawal was discussed (E3).
Sensitivity check. Two things could shift the judgement.
- E7 consists of statements the division and brigade commanders made after the event, when both may have wanted to lessen their share of the blame. Without E7, H2 still has no inconsistencies, but H1 and H3 each lose one, so the margin over H3 narrows.
- If the British war diary (WO 281) or the British official history showed that brigade had reported the battalion's condition accurately to division during the day on the 24th, H2 would weaken and H3 would rise.
Conclusion. Likelihood terms follow the analytic standards of the US Office of the Director of National Intelligence (ODNI) (source 19).
- That the main reason was H2 (misread situation) is likely.
- H4 (avoiding break-out losses) is unlikely. It weighed heavily in the decision on the night of the 24th but does not explain the daytime decision.
- H3 (relief plan preferred) and H1 (deliberate hold) are each very unlikely.
H2 and H4 can both hold: during the day they waited because they did not know the facts, and at night because the risk looked too great. Our confidence is moderate. There is direct evidence in the commanders' contemporary journals and 1951 interviews, but all of it comes from a single volume that draws together American records.
Key assumptions
As of 10 November 2026 this analysis rests on seven assumptions.
| Assumption | Why we hold it | Rating | What would show it wrong |
|---|---|---|---|
| The official history's times are accurate to within about an hour | It quotes US 3rd Division operations journal entries with their times (source 1) | Solid | British war diary times differing by more than two hours for several events |
| Forty men came back | The official history and the House of Commons statement of 2 May 1951 give the same figure independently (sources 1, 2) | Solid | Regimental rolls showing a different figure |
| 21 officers and 509 other ranks were captured | Found only in the official history, which cites 1976 correspondence from the battalion's adjutant at the time and an I Corps report on the battalion's action (source 1 p. 428) | Caveated | Regimental rolls or the British official history showing different figures |
| Hill 235 is the peak south-west of the memorial park | The official history's description of the position, the museum archive and the SRTM peak all agree (sources 1, 10, 16) | Solid | The 235 spot height on a 1950s 1:50,000 map lying on a different peak |
| Route 5Y ran up the same valley as today's Gamaksan-ro | The side of the road on which each of the four hills lies matches in every case (our own comparison) | Caveated | A contemporary map showing 5Y in a different valley |
| Gloster Crossing is the ford in front of Chiljungseong | The official history's "ford straight ahead of his lines" and the position on Map 34 (sources 1, 18) | Caveated | A contemporary map or the British war diary pointing to a different spot |
| The division commander did not know the battalion's true condition during the day on the 24th | The division commander's own statement and Van Fleet's private assessment (source 1 pp. 428–429) | Caveated | A brigade-to-division report of the 24th turning up in the journals with an accurate account of the battalion's condition |
The ratings are our own three-step scale: solid (backed by several sources), caveated (some basis, with conditions), unsupported (too weak to lean on).
Quality of information: why casualty figures and times differ between sources
The figures for Solma-ri differ from source to source. Statements issued just after the battle relied on survivors' accounts, the official history was built on journals, and propaganda articles had their own aims; each was written at a different time for a different purpose. As of 10 November 2026 this analysis takes the US Army official history as its baseline and sets the other records alongside it, with their sources, as below.
| Issue | Other records | Official history (source 1) | How we treat it |
|---|---|---|---|
| Start of the attack | The Minister of Defence's statement to the House of Commons on 2 May 1951 gives 0120 on the 24th (source 2); the House of Lords statement says the same (source 3). The Chinese account puts the crossing and the start of the attack at 2100 on the 22nd (source 6, Chinese account) | First crossing at about 2200 on the 22nd (p. 388); Lieutenant Curtis's VC citation also gives the night of 22/23 April (source 5) | We give the night of the 22nd |
| The CO and the wounded left behind | The Commons statement gives about 200 wounded (source 2) | About 50 stretcher cases (p. 426); the 200 or so are the wounded carried on Centurions when the RUR and RNF withdrew on the 25th (p. 424) | About 50; that the two figures were conflated is our inference |
| The CO's fate | The Commons statement, drawing on the survivors, says the battalion commander, two medical officers and about 200 wounded stayed in the area of the first engagement (source 2). His citation says he led a small party out and was captured within 24 hours (source 4) | When he announced that he would stay on the hill with the wounded, the medical officer, the chaplain and several medical orderlies volunteered to stay with him; the history does not say what became of him (p. 426) | The official history records only his stated intention. We follow the citation for what happened and note that the Commons statement differs |
| Relief forces | The Commons statement names the Filipino battalion and the tank company of the US 15th Infantry on the 24th, and the Hussars' Centurions on the 25th (source 2). The Chinese account says the relief force of the 24th had the support of more than 10 aircraft and 24 tanks, and claims its leading and rear tanks were routed at a defile; it gives the relief force of the 25th as 8 aircraft and more than 20 tanks (source 6). The Korean encyclopedia names a "British 8th Tank Battalion" (source 7) | Four light tanks and six Centurions on the 24th; the leading light tank's track damaged in a defile (pp. 412–414) | The official history and the Korean encyclopedia agree that the force was stopped on a narrow road. The Chinese account is treated as a claim only |
| Outcome | The Chinese account says the main peak of Hill 235 was taken at 0800 on the 25th and the defenders "wiped out" (source 6). The Korean encyclopedia says all but D Company were captured on the 26th, with about a third of the strength lost (source 7) | Break-out on the 25th, 40 survivors, 21 officers and 509 other ranks captured (pp. 427–428) | We give the 25th. We read "wiped out" as a stock phrase for a unit ceasing to exist |
| Strength | The Chinese account puts the Solma-ri defenders at over 1,000 and the 29th Brigade at over 5,500 (source 6) | 28 officers and 671 other ranks in the battalion, plus 74 attached artillerymen (p. 428) | We use the official history's figures |
- Figures not used: a Korean travel article's "67 escaped, 59 dead, 526 captured" (source 13) and Gloucestershire County Council's "39 returned, 522 captured" (source 14) could not be traced to an original source, and the council's sheet also gets a unit name wrong. The 803 British missing (37 officers and 766 other ranks) in the Commons and Lords statements covers all "recent land operations" as reported up to noon on 2 May, so we did not use it as a figure for the Glosters (sources 2, 3). The official history gives no separate figure for the battalion's dead, so we give none. The brigade's first report of 622 "either KIA, WIA, or missing" included the attached artillery, and most were later confirmed as prisoners (source 1 p. 428).
- Single source: the official history's account of B Company (p. 411) relies on a memoir by the battalion's adjutant at the time. The Chinese account is a single article and does not give its own losses (source 6). We did not use the Chinese anecdote of one soldier capturing 63 men.
- Not seen: we could not open the originals of volume II of the British official history, the Gloster battalion's war diary (UK National Archives, WO 281), volume 9 of the Institute for Military History's History of the Korean War (『6·25전쟁사』) or the official history by China's Academy of Military Science. The US official history names the ROK 1st Division commander only as General Kang; we could not confirm his full name from the Korean official history, so in the text he appears by appointment.
- Names that get confused: the Korean encyclopedia's "Battle of Jeokseong" (적성전투) is the same battle (source 7). "Choksong" in English sources is Jeokseong, not the similarly named prisoner-of-war camp in North Korea.
Lessons for today's commanders
The lessons of Solma-ri for a commander in 2026 come down to three things: gaps, reports and routes.
- Gaps with neighbouring units: what decided the battalion's chances of survival was not its front but the gaps on its flanks. The eastern gap became a Chinese corridor from the first day (source 1 p. 387), and the last way home opened in the west, on the ROK 1st Division side. Left empty, a gap becomes the enemy's approach; filled, it becomes your own way out.
- Reports and a commander's language: Ridgway's view was that the brigade commander should have known the CO was "much given to quiet understatement" (source 1 p. 429). Higher headquarters should ask not whether a unit is "all right" but for numbers: effective strength, ammunition and how long it can hold. Had such numbers gone up during the day on the 24th, the plan to wait until 0630 might have changed.
- Terrain and the means of relief: that the Centurions could not get through the defile was already known from reconnaissance (source 1 p. 412). A relief plan has to be built around the narrowest road, not the strongest tank.
- Sustainment: stores left behind in the valley, and an airdrop held up by tangled command channels, cut the time the battalion could hold (source 1 pp. 411, 415).
- Liaison in combined operations: the CO did not know where the ROK regiment next to him was, and the tanks with the ROK force at first mistook the survivors for the enemy (source 1 pp. 426–427). Liaison officers and recognition means between units of different nations need to be agreed before the battle.
Limits
The hypothesis ratings and likelihood terms here are our judgements, not calculated probabilities. Most of the evidence for the timeline and the decisions comes from a single volume of the US official history; we could not open the British, Korean or Chinese official histories or the British war diary. Terrain figures are readings from 30 m SRTM, which reads peaks low, and the positions of Hills 182 and 144 and of the crossing could not be fixed from 1950s maps.
Sources
- US Army Center of Military History, Billy C. Mossman, Ebb and Flow, November 1950–July 1951 (United States Army in the Korean War, CMH Pub 20-4, 1990), chapters 21 and 23, pp. 379, 385–389, 393–397, 411–429. Full text of the DTIC copy (Internet Archive). https://archive.org/details/DTIC_ADA232745 (accessed 2026-11-10). Web transcription, chapter 21 https://koreanwaronline.com/history/EbbAndFlow/Ch21.htm , chapter 23 https://koreanwaronline.com/history/EbbAndFlow/Ch23.htm (accessed 2026-11-10)
- UK House of Commons Hansard, statement by the Minister of Defence on operations in Korea, HC Deb 1951-05-02 vol 487 cc1190–1191. https://api.parliament.uk/historic-hansard/commons/1951/may/02/korea-operations-1 (accessed 2026-11-10)
- UK House of Lords Hansard, statement on operations in Korea, HL Deb 1951-05-02 vol 171 cc636–637. https://api.parliament.uk/historic-hansard/lords/1951/may/02/operations-in-korea (accessed 2026-11-10)
- London Gazette, supplement 39994, Victoria Cross citation for Lieutenant-Colonel Carne (1953-10-27), p. 5693. https://www.thegazette.co.uk/London/issue/39994/supplement/5693/data.pdf (accessed 2026-11-10)
- London Gazette, supplement 40029, posthumous Victoria Cross citation for Lieutenant Curtis (1953-12-01), p. 6513. https://www.thegazette.co.uk/London/issue/40029/supplement/6513/data.pdf (accessed 2026-11-10)
- China Military Online (中国军网, run by the PLA Daily), "雪马里战斗:志愿军痛歼格罗斯特营" (The Battle of Solma-ri: the Volunteers wipe out the Gloster battalion), reprinted from Study Times (学习时报) (2021-08-31). Chinese account. http://www.81.cn/js_208592/10082954.html (accessed 2026-11-10)
- Academy of Korean Studies, Encyclopedia of Korean Culture, "적성전투 (積城戰鬪)" (Battle of Jeokseong) (written 2013, revised 2023-02-07). https://encykorea.aks.ac.kr/Article/E0049173 (accessed 2026-11-10)
- Ministry of Patriots and Veterans Affairs, English website, Key Battles (Geumgulsan entry). https://www.mpva.go.kr/english/contents.do?key=1372 (accessed 2026-11-10)
- Segye Ilbo, column by a professor in the Department of Military History, Korea Military Academy, "설마리 전투의 전술적 패배와 작전적 승리" (Solma-ri: tactical defeat, operational victory) (2026-04). https://segye.com/newsView/20260426508413 (accessed 2026-11-10)
- National Museum of Korean Contemporary History, modern history archive, "설마리 전투지" (Solma-ri battlefield) (photographed 2015). https://archive.much.go.kr/data/01/folderView.do?jobdirSeq=523 (accessed 2026-11-10)
- Paju City, international exchange: exchange log with the sister city of Gloucester, UK. https://www.paju.go.kr/www/intropaju/intropaju_04/intropaju_04_03/intropaju_04_03_05.jsp (accessed 2026-11-10)
- Kyunghyang Shinmun, history column on Chiljungseong and the Gayeoul ford (2023-09-10). https://www.khan.co.kr/article/202309100800021 (accessed 2026-11-10)
- Korea Tourism Organization, VisitKorea, travel article on the memorial park to the British at Solma-ri (2025). For comparison; figures not used. https://korean.visitkorea.or.kr/detail/rem_detail.do?cotid=55a6bc26-ab0b-484a-b409-61f472662ce5 (accessed 2026-11-10)
- Gloucestershire County Council, Battle of the Imjin River information sheet (2021). For comparison; figures not used. https://www.gloucestershire.gov.uk/media/nfsprbjs/battle-of-imjin-river-info-sheet-2021-02-10.pdf (accessed 2026-11-10)
- OpenStreetMap contributors, place names, roads and rivers (Overpass API queries, ODbL). https://www.openstreetmap.org/copyright (accessed 2026-11-10)
- Elevation data: Mapzen/AWS Terrain Tiles (SRTM and others). https://github.com/tilezen/joerd/blob/master/docs/attribution.md (accessed 2026-11-10)
- Imperial War Museums, collection record for photograph BF 10280 (British official photographer, taken five weeks after the battle, public domain). https://www.iwm.org.uk/collections/item/object/205190861 (accessed 2026-11-10). Image copy: Wikimedia Commons https://commons.wikimedia.org/wiki/File:Gloster_Hill.jpg
- US Army Center of Military History, Billy C. Mossman, Ebb and Flow, Map 34, "The British 29th Brigade Sector, 25 April 1951" (unit positions at 0900 on 25 April, public domain). Original https://history.army.mil/books/korea/maps/map34_full.jpg (checked via the Internet Archive copy of 2023-05-31, accessed 2026-11-10). Image copy: Wikimedia Commons https://commons.wikimedia.org/wiki/File:The_British_29th_Brigade_Sector_during_the_Battle_of_the_Imjin_River,_25_April_1951.jpg
- Office of the Director of National Intelligence, ICD 203 Analytic Standards (2015), likelihood table on p. 5 of the PDF. https://archive.dni.gov/files/documents/ICD/ICD-203.pdf (accessed 2026-11-10)
- UK Ministry of Defence and Veterans UK, "Graves of lost Korean War soldiers identified" (2024-11-15). https://www.gov.uk/government/news/graves-of-lost-korean-war-soldiers-identified (accessed 2026-11-10)


