
Arnhem Bridge (1944): how a battalion without the south end still blocked the crossing
· Updated · 1944-09-17 – 1944-09-21
This analysis is for education and research. Content on ongoing wars may change as new information emerges. We label claims separately from confirmed facts.
Command this battle yourselfIn-depth part 2 →Arnhem Bridge in depth: how a force holding only the north end blocked the crossingHow the decision points in this analysis are adjudicated → · Glossary
Overview (BLUF)
The British held the north end of the Arnhem road bridge from 17 to 21 September 1944 but were never relieved: their drop zones lay 10–13 km west of the town, the battalions sent after them were blocked in the streets, and the Nijmegen bridge, about 18 km away, fell to Anglo-American troops only on the evening of the 20th (sources 1, 2, 5, 6, 11, 13). On the evening of 17 September 1944, 2nd Parachute Battalion of the British 1st Airborne Division reached the north end of the Lower Rhine road bridge at Arnhem, after a march of about 13 km from its drop zone. It never took the south end. The battalion and the units that followed, about 740 men in all, moved into buildings either side of the ramp, kept the bridge within their fields of fire and stopped an SS reconnaissance battalion's rush on the morning of the 18th. From the 19th the Germans broke and burned the buildings one by one. A truce on the evening of the 20th handed over the wounded, and resistance ended at about 0500 on the 21st (sources 1, 4, 6).
The force fought from one end, with the far bank in enemy hands, to slow the traffic. Meanwhile 10th SS Panzer Division had to cross the river by ferry. Yet the divisional diary records four tanks crossing at 1815 on the 20th. The defence slowed German reinforcement, but it never stopped all movement over the bridge (sources 4, 11, 13).
Background and Strategic Context
Market Garden called for airborne troops to seize a chain of Dutch bridges so that British XXX Corps could drive up that road and over the Rhine. Arnhem, the northernmost, fell to 1st Airborne Division. A shortage of transport aircraft spread the landing over three days, and the air planners refused to land close to the bridges. The drop and landing zones lay north of the river, some 10–13 km west of the town (sources 2, 13).
1st Parachute Brigade was to reach the bridge by three roads: 2nd Battalion along the river on the Lion route, 3rd Battalion on the Utrecht road (Tiger) and 1st Battalion to the north (Leopard). A plan for the divisional reconnaissance squadron to race ahead in jeeps collapsed when its leading vehicles ran into the blocking line of Battalion Krafft (sources 2, 8). The battalion commander had objected from the outset that a bridge is a narrow defile, and much easier to take with troops on both sides (source 1).
Intelligence also fell short. The battalion expected counter-attacks, even with tanks, but was not told that 9th and 10th SS Panzer Divisions were refitting near Arnhem. Its commander learned this from prisoners on the afternoon of the 18th (sources 1, 12).
Terrain and Weather
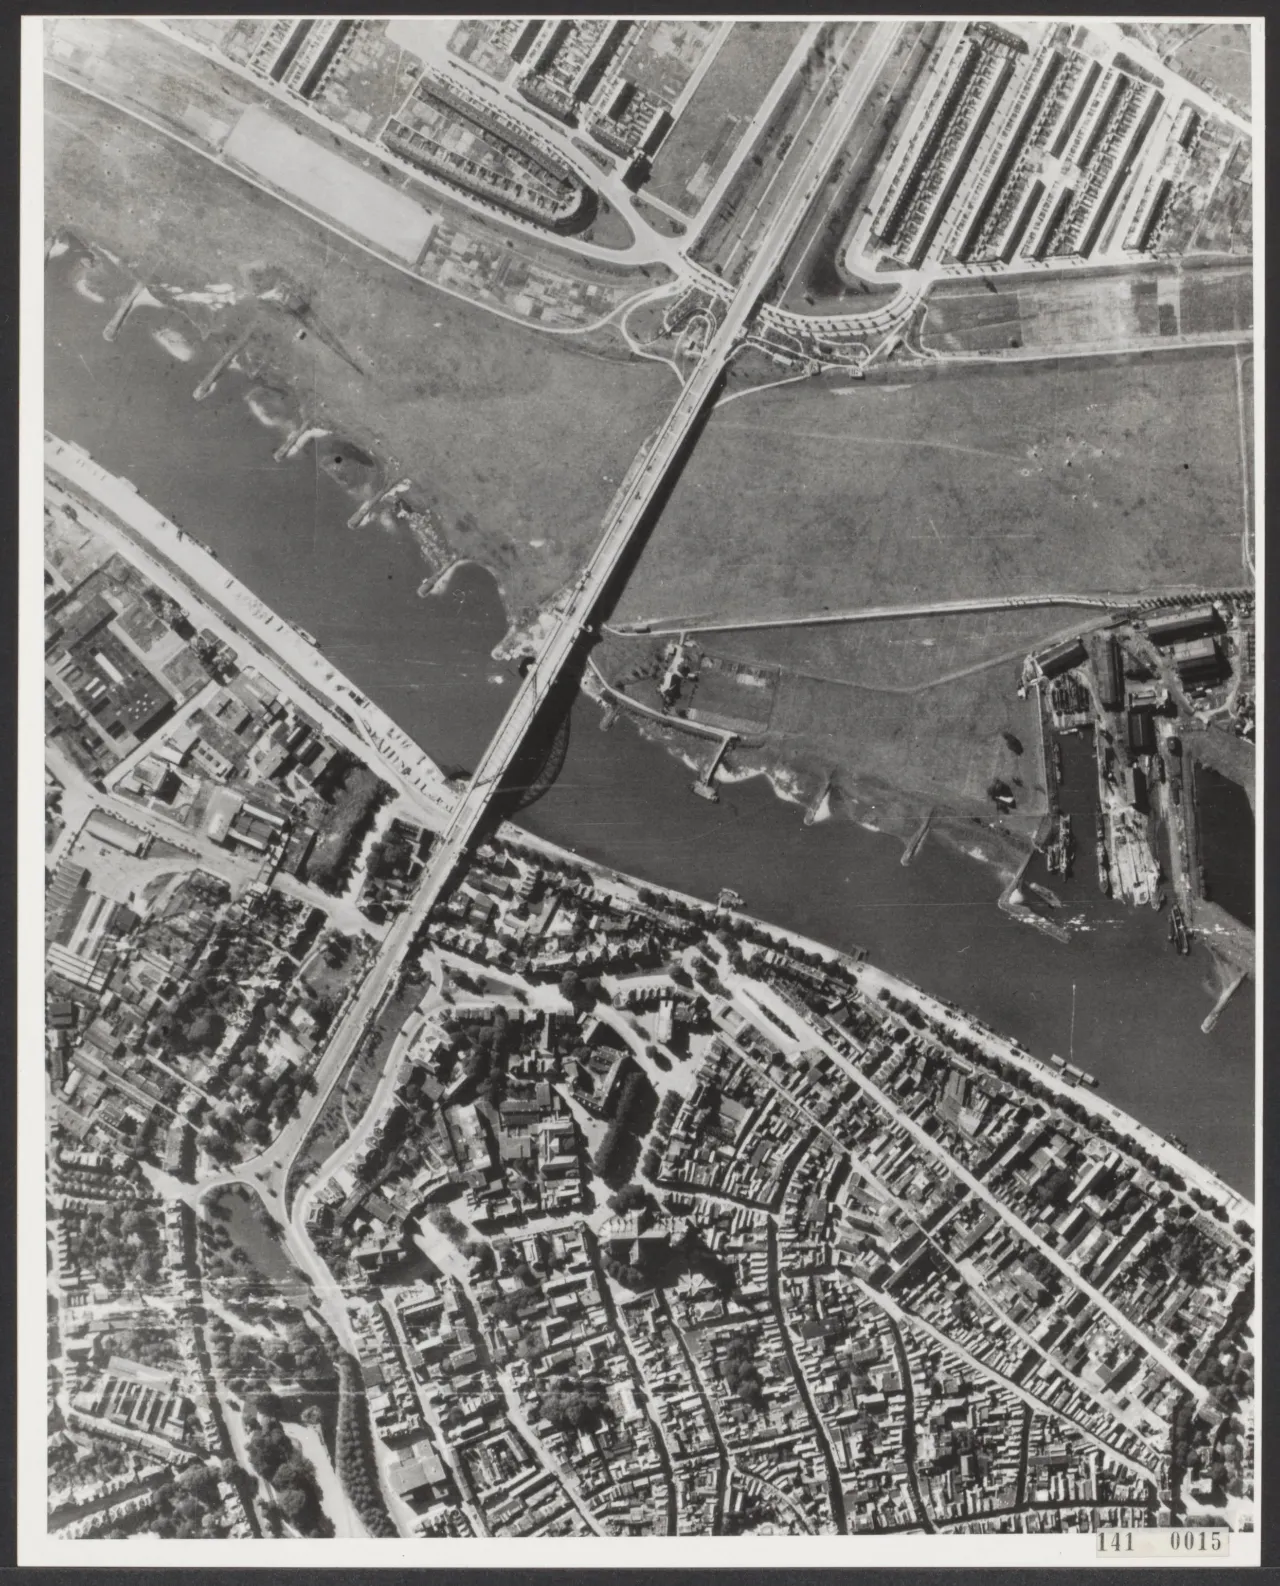
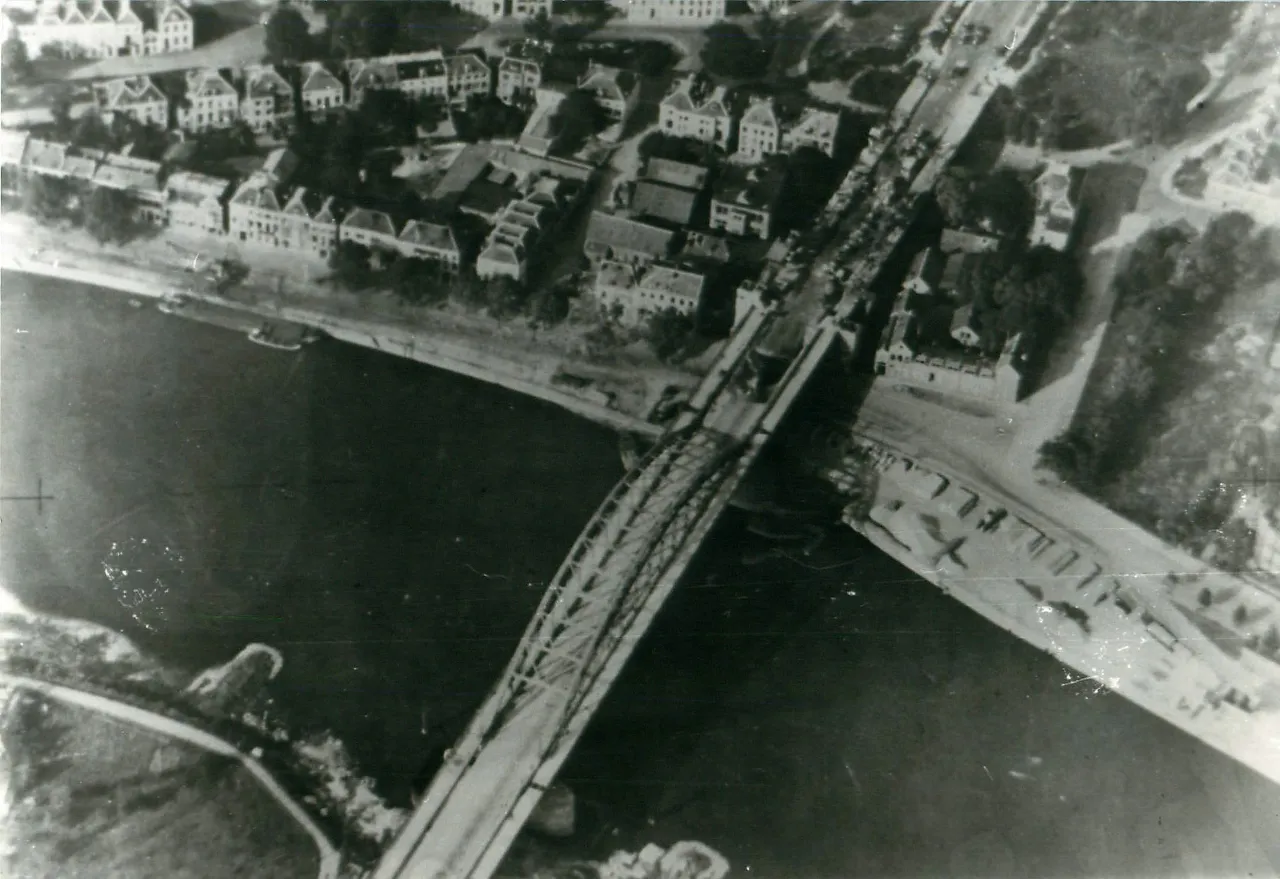
The bridge rises from low river meadows on the south, crosses the river and enters the town on the north. Today's bridge is 601 m long overall. On the north side the ramp runs on piers and arches, with roads passing beneath. Whoever held the buildings overlooking it could fire from the side and from above at vehicles coming off the span (figure 1). In the south all was open, and troops rushing across the span had no cover (sources 3, 6, 13).
The river road was the axis the Germans held most thinly. Battalion Krafft had set its defence between the railway and the Utrecht road, with only light patrols by the river. By our own calculation the railway bridge is about 3.8 km from the road bridge and the pontoon bridge about 0.9 km. The high ground of Den Brink, beyond the railway, stands at about 21 m against about 15 m for the town at the north end. It is not much higher, but it overlooked both road and railway (sources 3, 19).
17 September was a new moon. On the time zone used in British orders (UTC+1) sunset was at about 1844 (own calculation). A moonless night might have offered cover, but the fire started by the flame-thrower lit the area like daylight (sources 1, 19, 20).
Forces and Dispositions
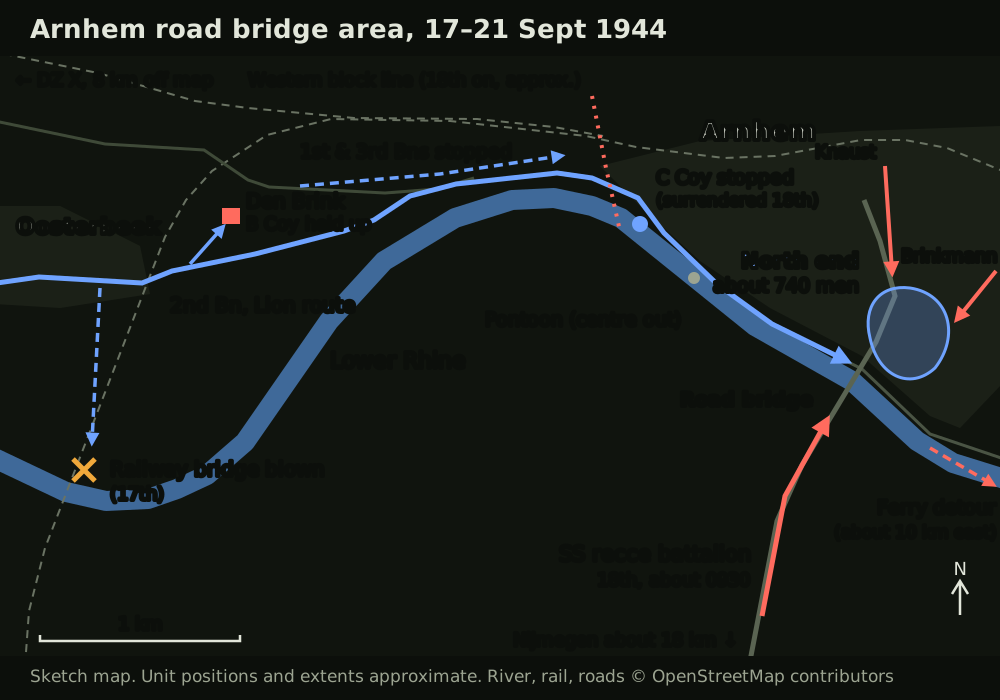
- British (north end): about 740 men by the usual count: 2nd Battalion about 340 (without C Company, including about 70 of B Company), Brigade HQ 110, sappers 105, RASC 30, C Company of 3rd Battalion 45, and others. There were five anti-tank guns (four in the 2nd Battalion account). A gunner observer was linked to the battery at Oosterbeek. The commanding officer's citation gives a fighting strength of at most 550, and the US official history a peak of about 500 (sources 1, 4, 12, 13).
- German: the reconnaissance battalion of 9th SS Panzer Division went south on the 17th and came back on the 18th (22 vehicles committed, about 400 men). Kampfgruppe Brinkmann attacked the north end from the east, and Kampfgruppe Knaust, with eight tanks and four infantry companies, from the north. A blocking line west of the centre stopped the other British battalions. More tanks and self-propelled guns came from the 19th, with Tigers that evening (sources 4, 5).
Course of the Action
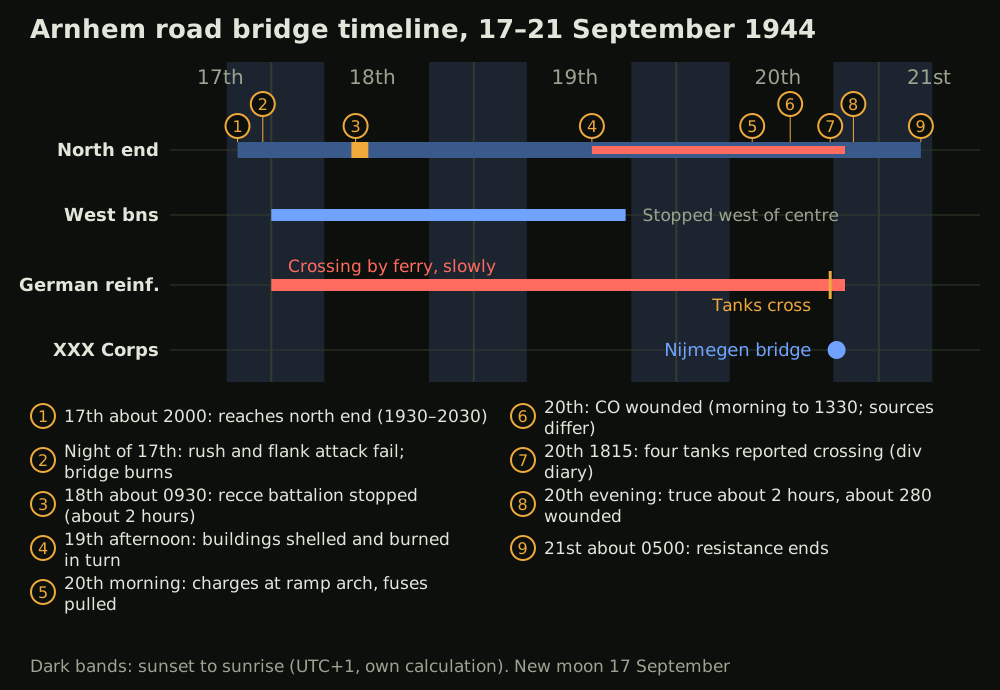
- The march (17 Sept, 1500–2000): Soon after 1500 the battalion was told not to wait for stragglers. The railway bridge was blown in front of C Company, and B Company was tied down at Den Brink. A Company dodged armoured cars by way of back gardens and reached the north end at about 2000; 1930 and 2030 are also recorded. C Company was stopped in the town and surrendered on the 18th (sources 1, 3, 11, 13, 17).
- Trying for the south end (night of the 17th): A party of seven fell back, and No. 2 Platoon's rush was stopped by a pillbox and an armoured car, with eight wounded. A platoon and sappers then mouseholed through the buildings to reach the pillbox from the side. The flame-thrower set an ammunition store alight, and the bridge could not be crossed that night. No usable boat was found (sources 1, 3).
- Stopping the rush (18 Sept, about 0930): The reconnaissance battalion drove through artillery fire registered on the southern approach and onto the bridge. The first four vehicles got through to the town, but those behind were hit by anti-tank guns and PIATs. After about two hours it withdrew, leaving 12 of its 22 vehicles. The divisional report says about ten, and the commanding officer's memoir seven (sources 1, 4, 9, 11).
- The perimeter tightens (18–19 Sept): As ammunition ran down, the commanding officer stopped sniping. The battalions coming from the west were blocked in the town. From the afternoon of the 19th the Germans shelled the buildings in turn and set fires with phosphorus. By that night there were 150 wounded in the cellars (sources 1, 5).
- The last day (20–21 Sept): British sappers fought German engineers at an arch of the ramp and pulled the fuses from their charges. The commanding officer was wounded in both legs by a mortar bomb. When the school fell, the remainder gathered in the garden behind Brigade HQ. A truce handed over about 280 wounded; the others tried to slip away in small parties and most were captured (sources 6, 7, 8, 10).
That same evening Anglo-American troops took the Nijmegen bridge. About 18 km still lay between it and Arnhem (sources 6, 11).
Decision Point Analysis
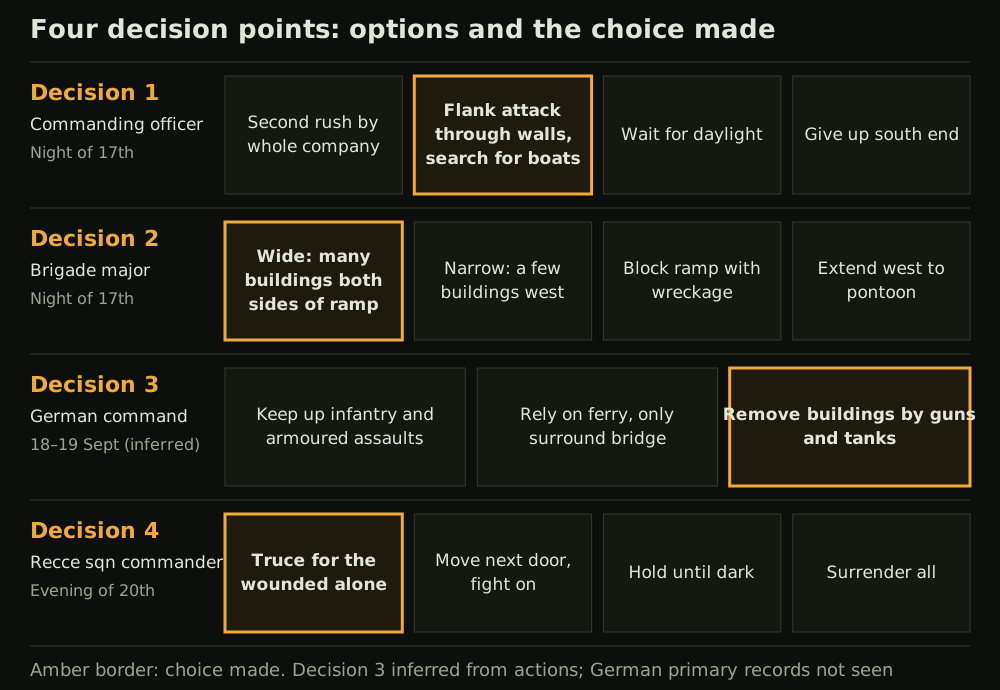
Decision 1: how to attack the south end (commanding officer, night of the 17th) — scenario phase 4 With the frontal rush stopped, the options were (a) a second rush by the whole company, (b) a flank attack and a search for boats, (c) waiting for daylight and the guns, or (d) giving up the south end. He chose (b). The attack did reach the pillbox, but the fire closed its own route forward, and no boats turned up. The divisional report describes an attempt by the brigade defence platoon to cross by boat, as does the US official history, while the memoir says no usable boat was found (sources 1, 11, 13). The price of missing the south end became plain from the 18th: an enemy coming from across the river could be stopped only on the bridge itself.
Decision 2: how wide a perimeter (brigade major, night of the 17th) — scenario phase 5 The options were (a) wide, across many buildings either side of the ramp, (b) narrow, in a few buildings to the west, (c) blocking the ramp with wreckage, or (d) extending west to the pontoon bridge. He chose (a). Arriving without the brigade commander, the brigade major split his men into parties for the buildings, then gave the commanding officer control of the whole force (source 7). The wide perimeter allowed fire on the ramp from both sides. Its cost came after the 19th, when movement between buildings was cut and each had to hold on alone (source 6).
Decision 3: how to open the bridge (German command, 18–19 Sept) German documents were not seen directly, so this is inferred from what was done. The options were (a) further infantry and armoured assaults, (b) leaving the bridge surrounded and relying on the ferry, or (c) removing the buildings one at a time with artillery and tanks. After the costly assaults of the 18th, the Germans turned to (c) on the afternoon of the 19th (source 5). It was slow but sure against an enemy running out of ammunition. Meanwhile 10th SS Panzer Division crossed little by little by ferry, and that delay had its effect on the fight at Nijmegen (sources 5, 13).
Decision 4: the wounded in the cellars (recce squadron commander, evening of the 20th) — scenario phase 10 The options were (a) a truce for the wounded alone, (b) moving them next door and fighting on, (c) holding until dark, or (d) surrendering the whole force. With the commanding officer's agreement he chose (a), first ordering men not from 2nd Battalion to scatter and get out. Fire was about to reach the cellars and medical supplies had run out. During the truce German troops moved closer to the positions, which made further defence harder still (sources 6, 8, 9).
Lessons
- Seize and retain are different tasks: Current doctrine describes seizing as a state in which the enemy can no longer place direct fire on the objective. The north-end force never met that test. But it did for some time succeed in retaining and blocking, which deny the enemy use of terrain without holding all of it (FM 3-90, source 14).
- Put anti-tank weapons where vehicles slow down: The 18th was decided at the end of the ramp rather than on the span. The first four vehicles got by, but once the anti-tank crews had the range, the column stopped.
- Register outside fire before the first crisis: The gunner observer overcame objections to fire ranging rounds at dawn. The battalion's own weapons could not have dealt with the southern approach.
- A defence without sustainment has a time limit: No resupply ever arrived. Saving ammunition bought time, but it also gave the enemy freedom to move.
- Mission command: Cut off from the brigade commander, the brigade major, the commanding officer and a sapper subaltern still acted within the intent. Commanders changed, but the task of covering the bridge stayed the same to the end (ADP 6-0, source 18).
Sources
- The Pegasus Archive, Lieutenant-Colonel John Frost (with extracts from the memoir A Drop Too Many and his citation). https://www.pegasusarchive.org/arnhem/john_frost.htm (accessed 2026-10-31)
- The Pegasus Archive, The Plan on the Ground. https://www.pegasusarchive.org/arnhem/depth_groundplan.htm (accessed 2026-10-31)
- The Pegasus Archive, The 2nd Battalion (narrative for 17 September). https://www.pegasusarchive.org/arnhem/depth_2ndbatt1.htm (accessed 2026-10-31)
- The Pegasus Archive, Arnhem Bridge - Monday 18th. https://www.pegasusarchive.org/arnhem/depth_bridge18.htm (accessed 2026-10-31)
- The Pegasus Archive, Arnhem Bridge - Tuesday 19th. https://www.pegasusarchive.org/arnhem/depth_bridge19.htm (accessed 2026-10-31)
- The Pegasus Archive, Arnhem Bridge - Wednesday 20th. https://www.pegasusarchive.org/arnhem/depth_bridge20.htm (accessed 2026-10-31)
- The Pegasus Archive, Major Tony Hibbert. https://www.pegasusarchive.org/arnhem/tony_hibbert.htm (accessed 2026-10-31)
- The Pegasus Archive, Major Freddie Gough. https://www.pegasusarchive.org/arnhem/freddie_gough.htm (accessed 2026-10-31)
- The Pegasus Archive, Major Dennis Munford. https://www.pegasusarchive.org/arnhem/dennis_munford.htm (accessed 2026-10-31)
- The Pegasus Archive, Lieutenant Jack Grayburn (with Victoria Cross citation). https://www.pegasusarchive.org/arnhem/jack_grayburn.htm (accessed 2026-10-31)
- HQ 1st Airborne Division war diary and operational report (reproduced by The Pegasus Archive). https://www.pegasusarchive.org/arnhem/war_divhq.htm (accessed 2026-10-31)
- 2nd Parachute Battalion war diary, operation order and A Company commander's account (WO 171/1237, reproduced). https://www.pegasusarchive.org/arnhem/war_2ndBatt.htm (accessed 2026-10-31)
- Charles B. MacDonald, The Siegfried Line Campaign, US Army Center of Military History, 1963, chapters 6–8 (HyperWar edition). https://www.ibiblio.org/hyperwar/USA/USA-E-Siegfried/USA-E-Siegfried-8.html (accessed 2026-10-31)
- US Army, FM 3-90 Tactics, 2023 (paras 9-68, B-5, B-55, B-57). https://armypubs.army.mil/epubs/DR_pubs/DR_a/ARN38160-FM_3-90-000-WEB-1.pdf (accessed 2026-10-31)
- Wikimedia Commons, File:De Rijnbrug van Arnhem 5 dagen voor de gevechten om de brug.jpg (RAF, PD-UKGov). https://commons.wikimedia.org/wiki/File:De_Rijnbrug_van_Arnhem_5_dagen_voor_de_gevechten_om_de_brug.jpg (accessed 2026-10-31)
- Wikimedia Commons, File:Aerial view of the bridge over the Neder Rijn, Arnhem.jpg (IWM MH 2061, PD-UKGov). https://commons.wikimedia.org/wiki/File:Aerial_view_of_the_bridge_over_the_Neder_Rijn,_Arnhem.jpg (accessed 2026-10-31)
- Liberation Route Europe, Het einde van C Compagnie, 2e Parachutistenbataljon. https://www.liberationroute.com/pois/698/het-einde-van-c-compagnie-2e-parachutistenbataljon (accessed 2026-10-31)
- US Army, ADP 6-0 Mission Command, 2019, chapter 1. https://armypubs.army.mil/epubs/DR_pubs/DR_a/ARN34403-ADP_6-0-000-WEB-3.pdf (accessed 2026-10-31)
- Open-Meteo, Elevation API and Historical Weather API (sunrise and sunset, UTC+1, as British "A" time), Arnhem area, 15–22 September 1944. https://archive-api.open-meteo.com/v1/archive?latitude=51.97&longitude=5.89&start_date=1944-09-15&end_date=1944-09-22&daily=temperature_2m_max,temperature_2m_min,precipitation_sum,sunrise,sunset,wind_speed_10m_max&timezone=Europe%2FAmsterdam (accessed 2026-10-31)
- NASA Goddard Space Flight Center, Phases of the Moon: 1901 to 2000 (new moon 17 September 1944, 12:37 UT). https://eclipse.gsfc.nasa.gov/phase/phases1901.html (accessed 2026-10-31)

